How do I track class attendance?
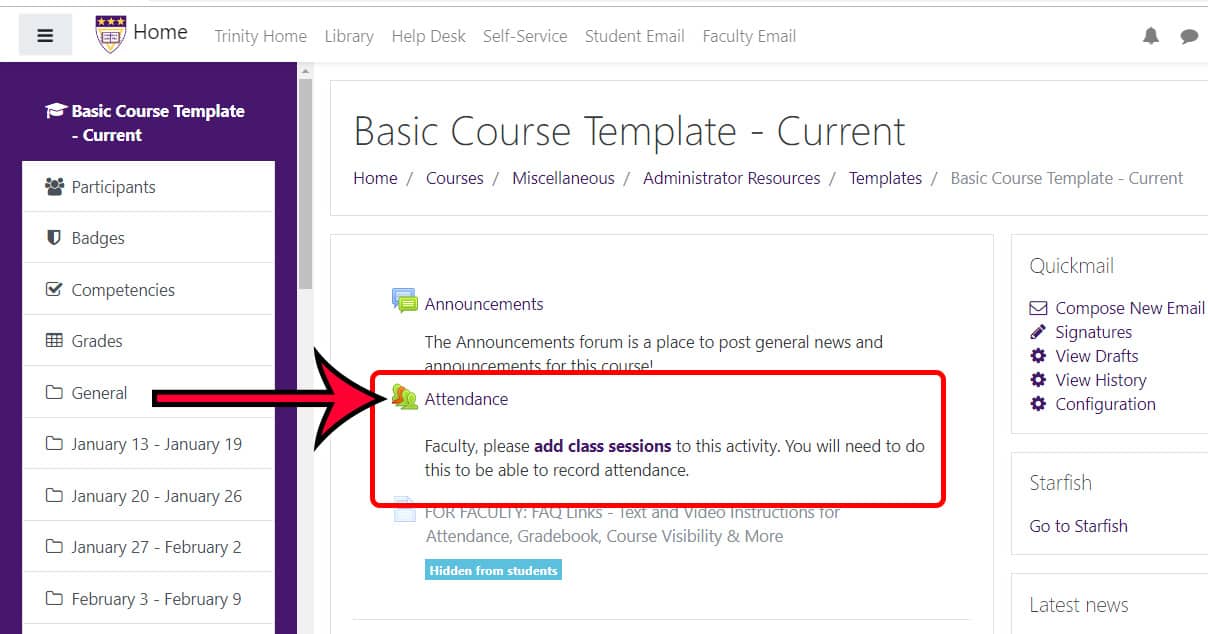
The Attendance activity in Moodle allows instructors to track course attendance and students to see a record of their course attendance. Every course in Moodle has an Attendance Activity shell in it, just underneath the “Announcements” forum. Faculty members must add their class sessions.
This Attendance data is required for Federal financial aid purposes, in addition to syncing with Starfish to provide a complete view of our students. Additional FAQs on taking attendance in online courses and taking attendance for internships, independent studies, and similar courses can be found at those links.
Adding Class Sessions to Your Attendance Activity
You can watch a short 90-second video on this process here.
- From the main page of your course in Moodle, click on the pre-loaded Attendance activity. This activity should be located near the “Announcements” forum in the top ‘General’ section of your course.
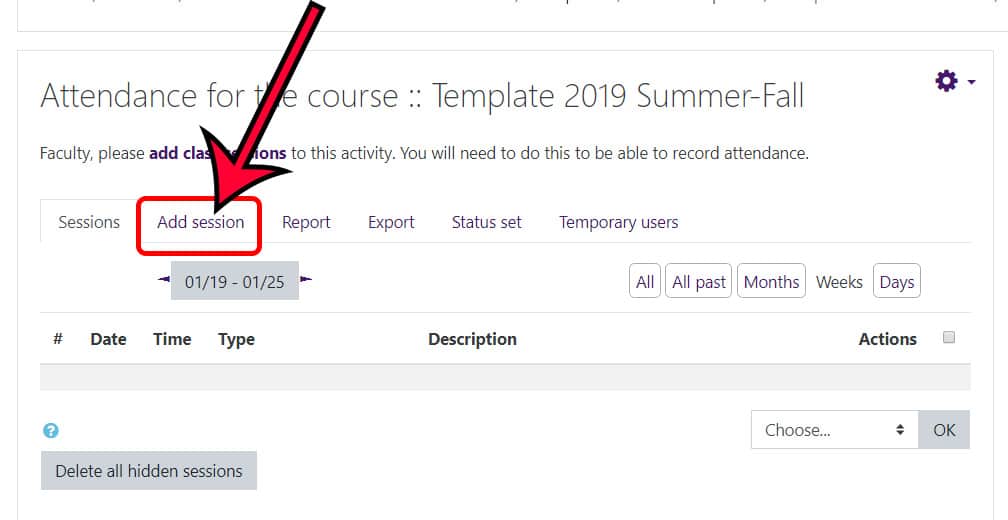
- From within the Attendance activity, click on the second tab, titled, “Add session.”
- On the “Add session” page, under the “Add session” heading, complete the:
- “Date” field (which is the first date the class meets)
- “Time” field (which is the time class begins and ends in 24hr time, so 6:30PM to 10:00PM course would be 18 30 to 22 00)
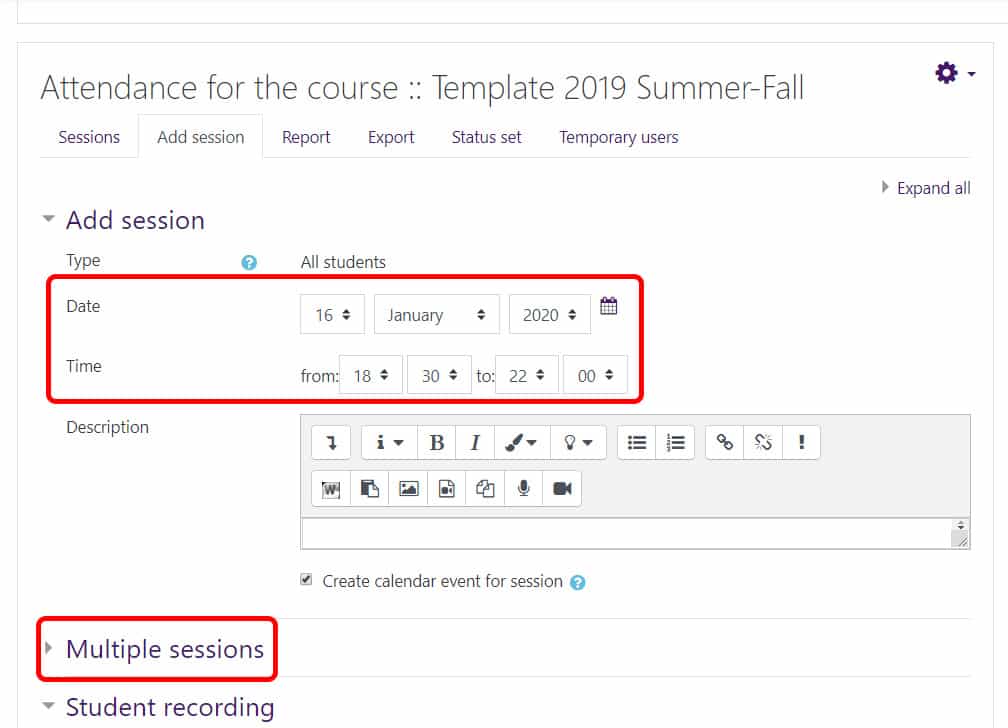
- If you want to add all of the class meetings for your term, expand the next section titled, “Multiple sessions.” If you are only adding one session (like a make-up class, for instance), you can skip this session and scroll right down to the “Add” button.
- Under Multiple sessions:
- Check the box next to “Repeat the session above as follows.”
- Next to “Repeat on” check the boxes next to the days of the week you meet.
- Complete the “Repeat until” date with the last day of class or of the term.
- DO NOT ADJUST THE “Repeat every” setting unless you do not meet every week. For instance, if you meet every other week, you would change this setting to ‘2’ instead of ‘1.’
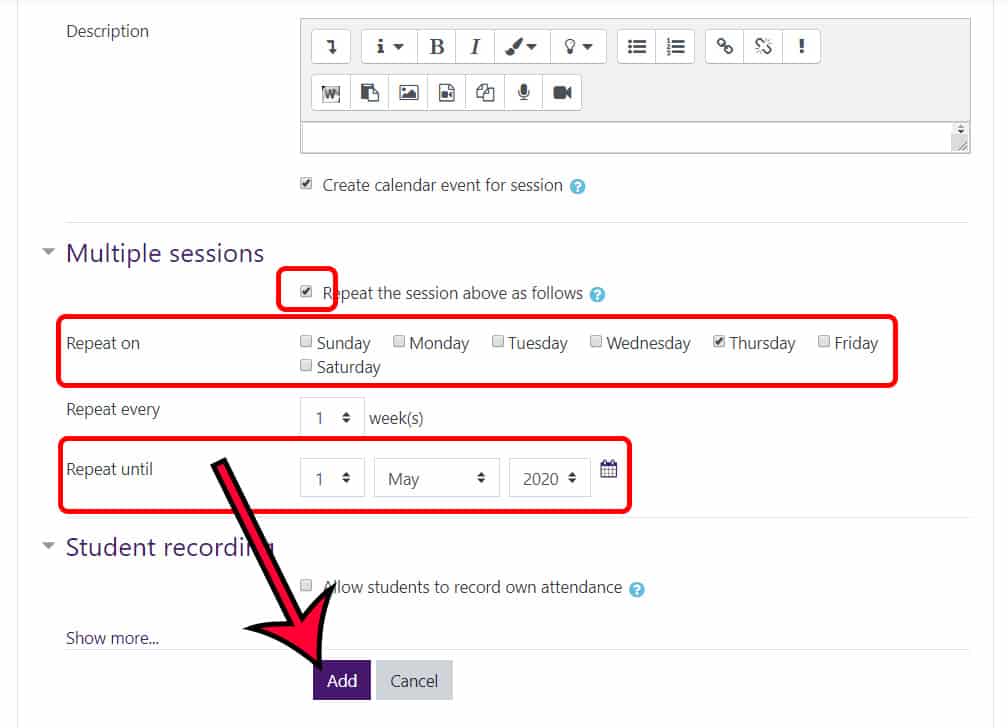
- Under Multiple sessions:
- Click the “Add” button to create your class sessions.
- The system will create all of your sessions as indicated and return you back to the main attendance activity page, with a notice of how many sessions it generated. (Notice the time now displays with AM/PM on this page.)

- If you have generated sessions where you will not meet (e.g., Labor Day, Thanksgiving, Spring Break, etc.), you can delete sessions one of two ways: individually or in a group.
- To delete a single class session, locate the session and click on the trash can icon in the ‘Actions’ column.
- To delete a group of sessions, check the boxes to the far right of each session. Scroll down to the bottom of the page. Change the action drop-down to ‘Delete’ and click ‘OK.’
- When the confirmation message appears, check to make sure you really want to delete those sessions. Click ‘Continue’ to delete the sessions.
Taking Attendance
Please note: you cannot submit attendance early; you must wait until the start date and time for class session you created has passed. If you set this sessions attendance to be taken Thursday at 6:30PM, even if it’s at 6:29 PM on Thursday, you must wait. Moodle does not officially report the attendance of students whose instructors can see the future, no matter how few seconds early it may!
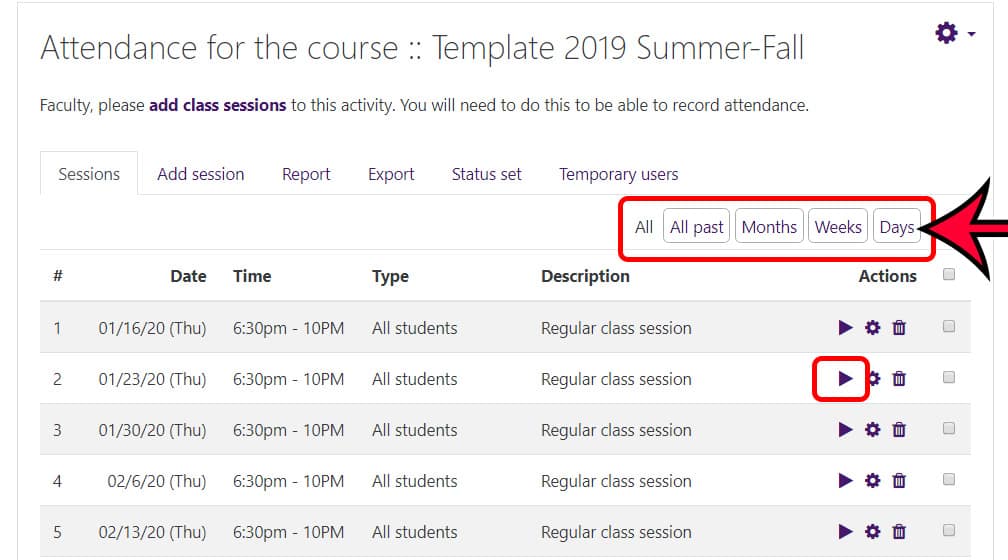
- Click on the “Attendance” activity from your course’s homepage.
- Sessions that have not had attendance taken will have a black arrow/triangle under the “Actions” column. You can control which sessions you see, including all past sessions and just this week’s or day’s session(s).
- Click on the black triangle/arrowhead to take attendance for a specific class session.
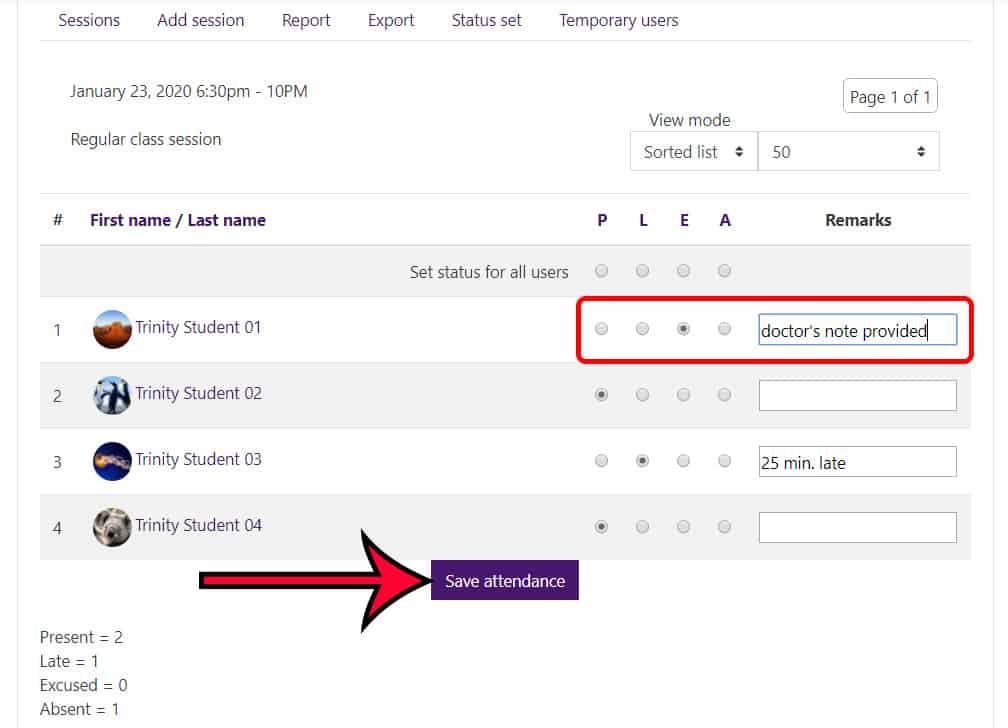
- On the screen where you enter the attendance for that session for individual students, you can mark them one of the following:
- P – Present
- L – Late
- E – Excused
- A – Absent
If you forget, there is a list in the bottom left corner.
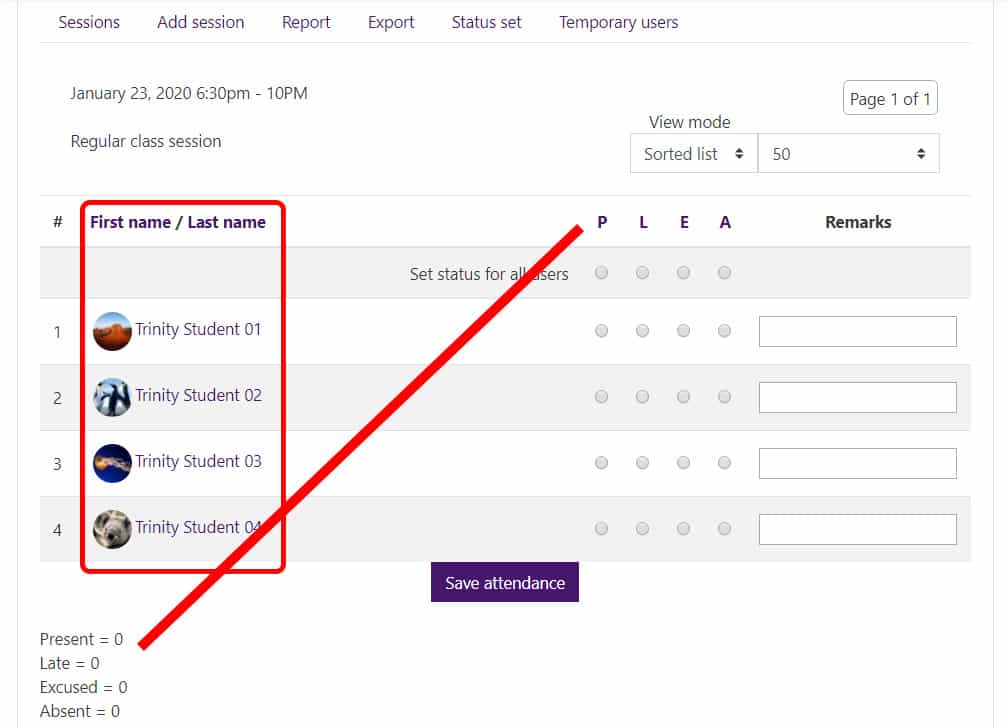
- After each student’s name, select the appropriate level of attendance status. NOTE: If you click one of these column headings, all students will have their status changed to the status you selected.
- Add any remarks, as necessary. Be aware that if the “Attendance activity” is available to students, they will be able to see any remarks you make on the attendance for their own attendance. (Students cannot see each other’s attendance.)
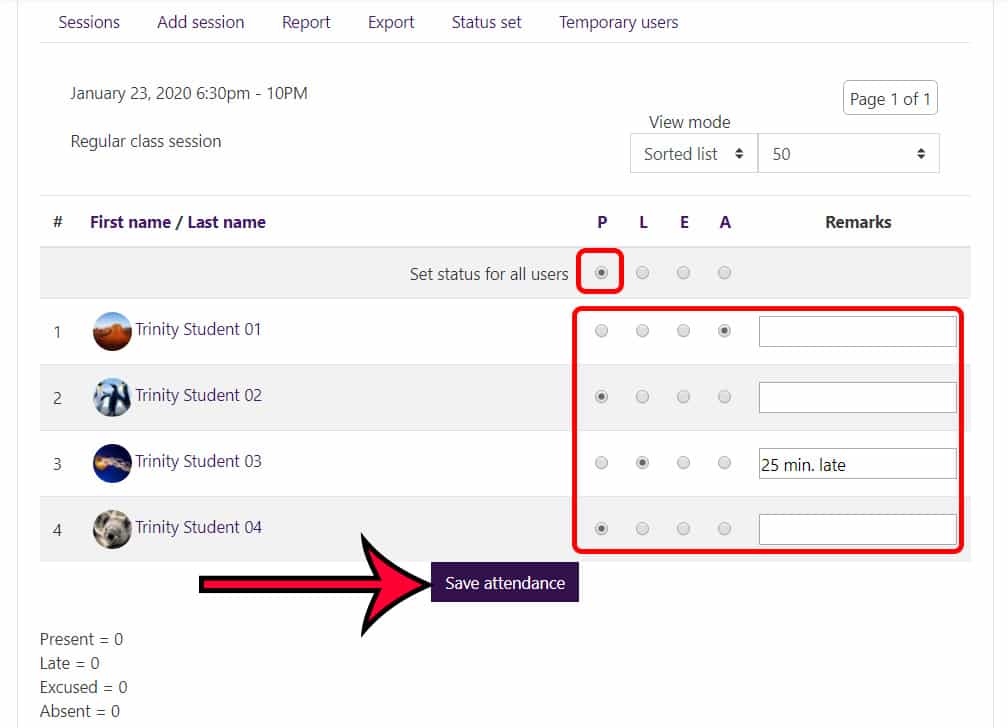
- When you are done, click the “Save attendance” button at the bottom.
- NOTE: Should you need to adjust the Attendance after you have already taken it, you can click the green arrow which is now in the place of the black arrow/triangle.
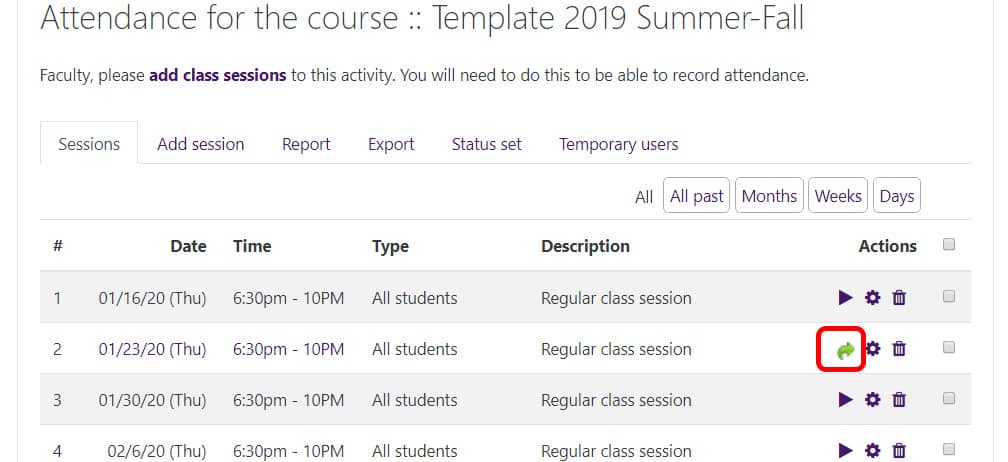
- This will bring you back to the taking attendance screen where you update your attendance. At this point, simply update whichever attendance entry you need to update. You will notice that Moodle gives you a summary in the bottom left how many students have been recorded at each level of attendance. Once you save your update, this change will be reflected in the summary.
- Click the “Save attendance” button.
Changing the Name of the Attendance Activity
- From the main page of your course, click on the gray ‘Edit’ gear wheel in the upper right corner.
- From the drop-down menu that appears, click the ‘Turn editing on’ option.
- Once the editing is on, locate the existing ‘Attendance’ activity.
- Click on the gray pencil to the right of the name of the ‘Attendance’ activity.
- Remove any extra text that you do not want in the activity name.
- When done, click enter to accept the changes or escape to keep the previous content.
Making the Attendance Activity Graded
This FAQ will walk you through updating the settings for the existing attendance activity so that the system grades it for you. By default, the attendance activity is not set to be graded.
To change the attendance activity settings such that it calculates a grade, you can follow the steps below. Moodle grades the attendance by allotting each attendance session two points. Each student can then earn the following:
- Present – 2 points out of 2 points possible
- Late – 1 point out of 2
- Excused – 1 out of 2
- Absent – 0 out of 2
For example:
If you have 16 attendance sessions, and student A has an attendance record of 13 P, 1 L, and 2 A, they would have earned 27 out of 32 points which is an 84.375 (27/32).
If you had told Moodle that the attendance activity was worth 100 points, that 84.375 is the grade that Moodle would put in the gradebook for the Attendance activity. If the activity was set-up to be out of a different number of points, say 20, the system would display a grade of 84.375% of 20 points which is 16.875 in the gradebook.
Note: you can click on any image to view a larger version of the image.
- Click on the “Attendance” activity from your course’s homepage.
- Click the gearwheel to the right of the activity name.
- From the options that appears, select the ‘Edit settings’ option.
- On the attendance activity settings page, expand the ‘Grades’ option.
- Change the ‘Type’ from ‘None’ to ‘Point.’
- Enter the grade for ‘Maximum grade.’
- Then scroll down and click the ‘Save and return to course’ button.
- Now the next time you enter attendance for a class session, the system will generate the grade from all of the existing data. If you have already taken attendance, the system-generated grade will not appear in the gradebook until you have entered attendance for a class session AFTER you have updated the settings.
Viewing the Attendance Report in Moodle
You can view a detailed report of your students’ attendance through the attendance activity.
- Click on the “Attendance” activity on your course’s homepage.
- From within the Attendance activity, click on the third tab, titled, “Report.”
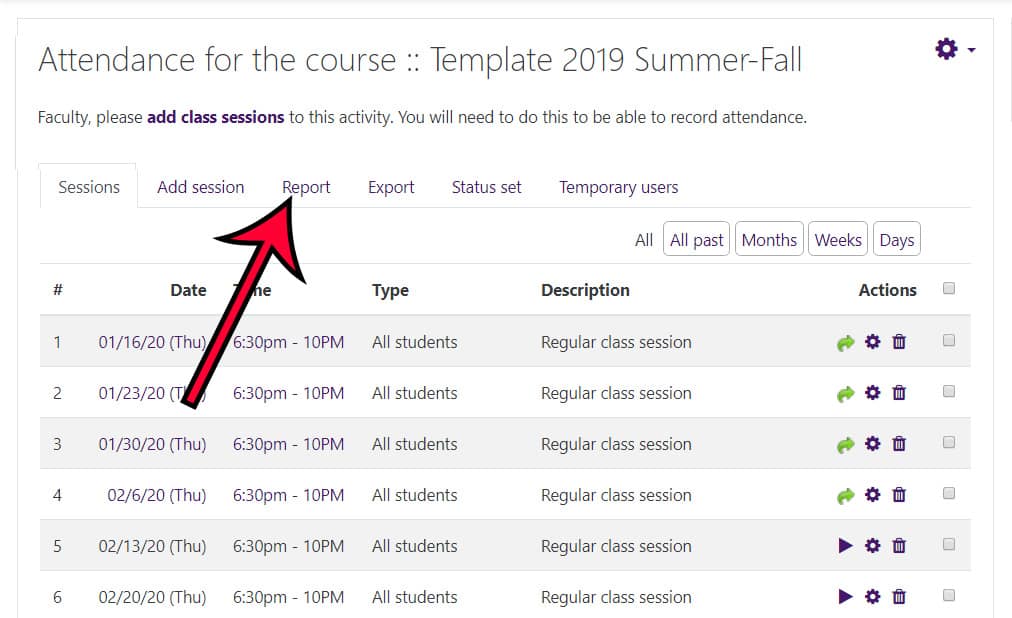
- Click on the time period you wish to view, for instance all past sessions or an overall summary.
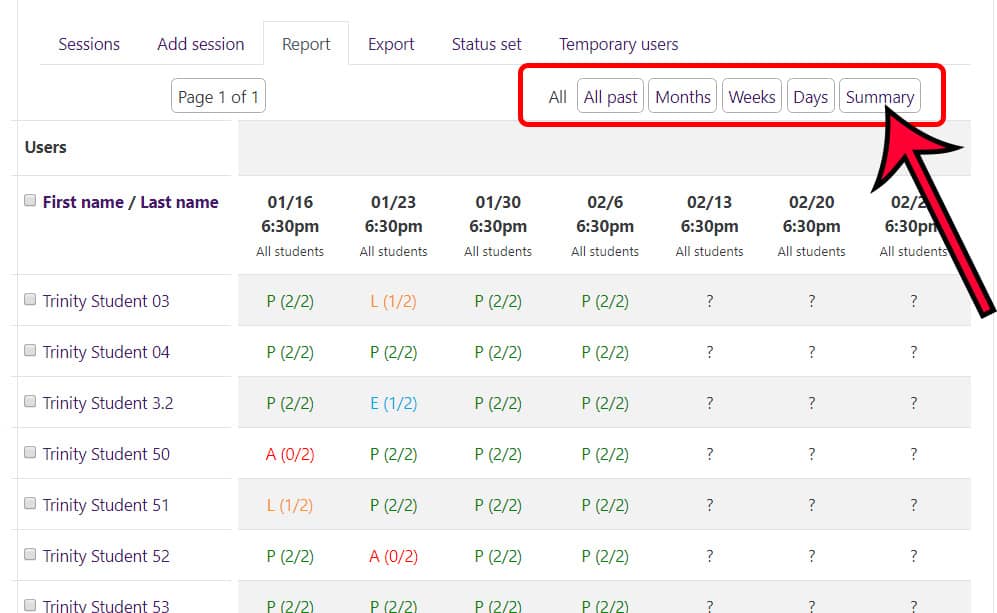
- It is very likely that you will not be able to see all of the data points on your screen. Scroll down to the bottom of the list for a horizontal scroll bar.
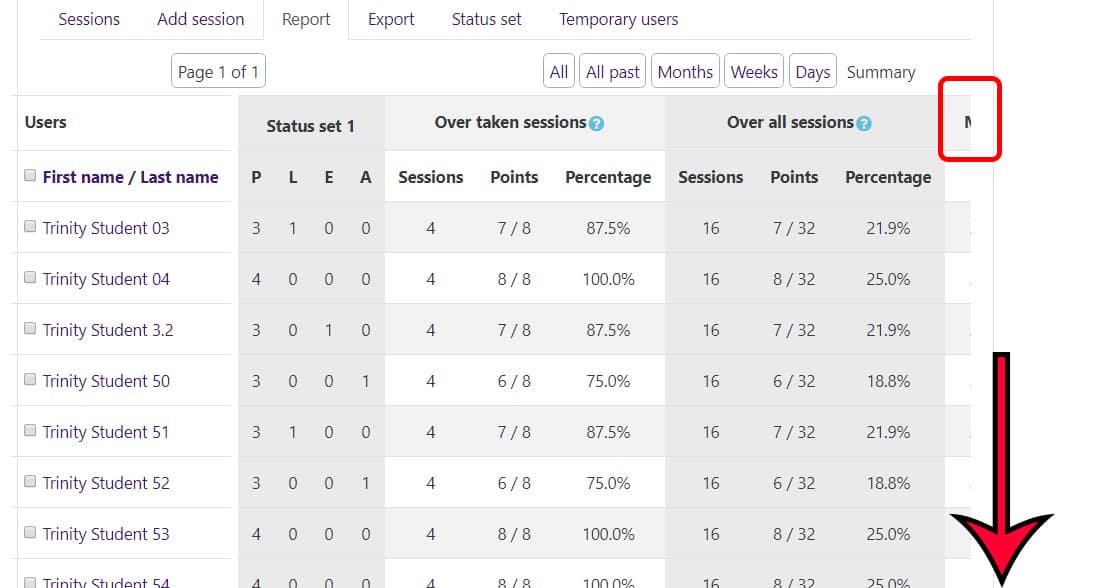
You can also change your browser’s zoom to get it all on one screen - You can send a message to students directly from this page, if you check the box next to the student’s name and click the “Send a message” button at the bottom.

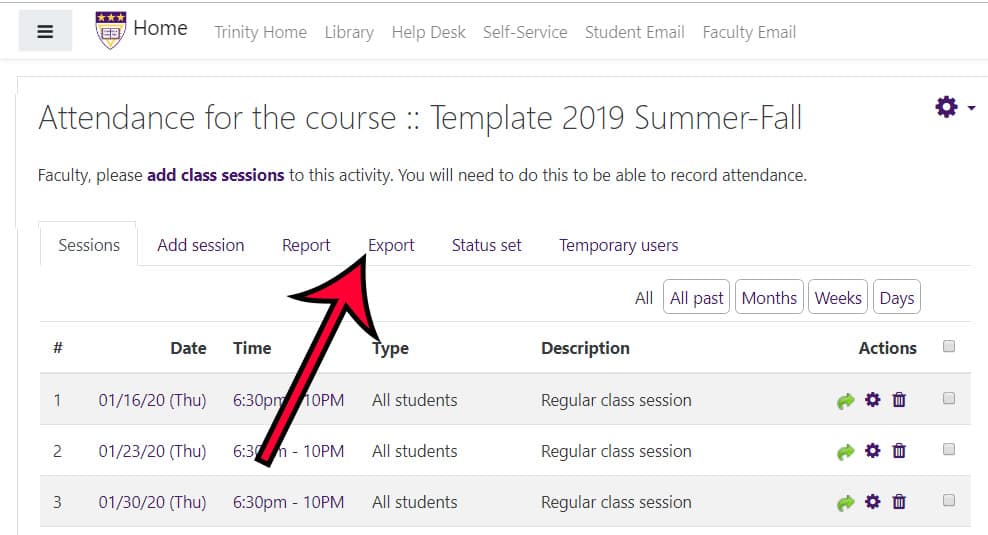
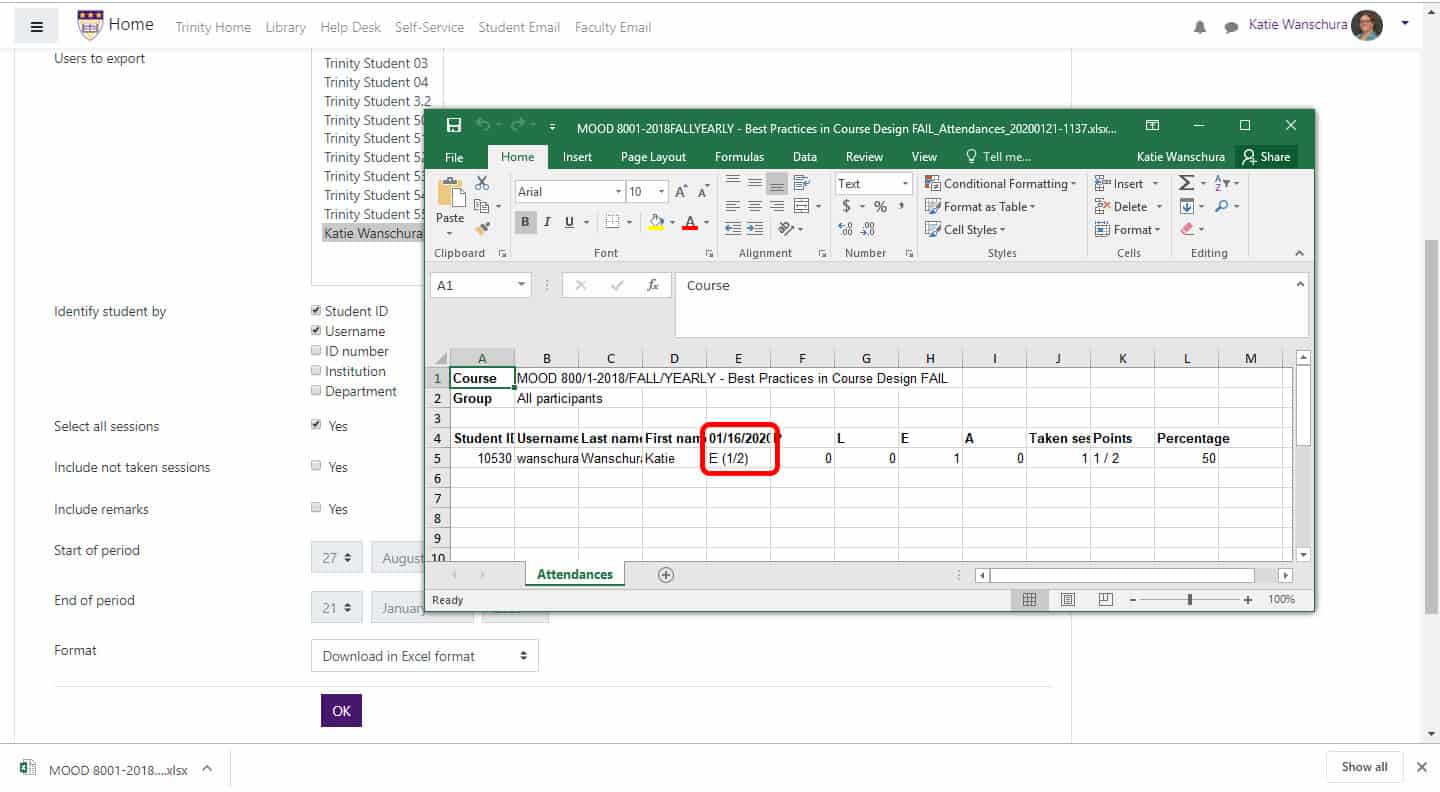
Exporting the Attendance Report in Moodle
You can export a detailed report of your students’ attendance through the attendance activity.
- Click on the “Attendance” activity on your course’s homepage.
- From within the Attendance activity, click on the fourth tab, titled, “Export.”
- If you would like the attendance data of a specific student, change the “Export specific users” drop-down to ‘Yes.’
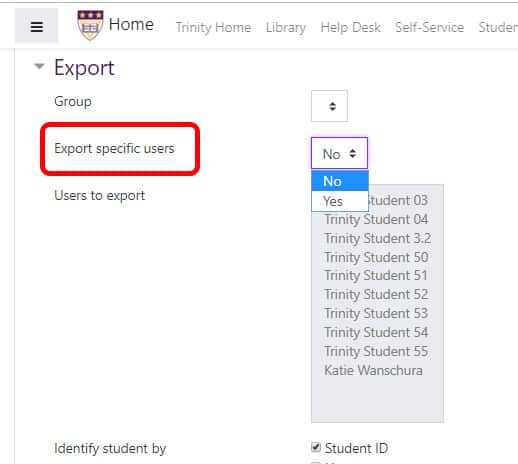
- Select your users. Update the remaining settings.
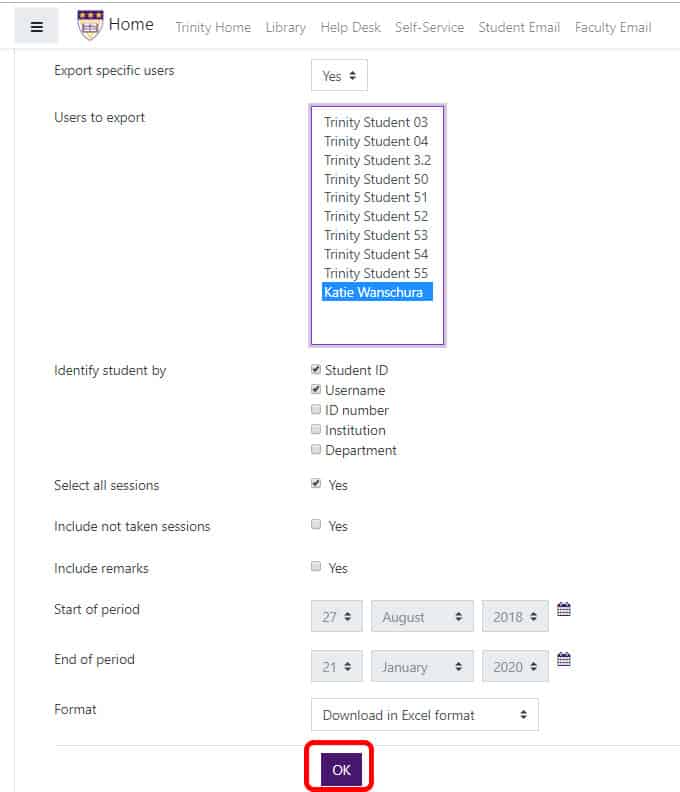
- Scroll down and click “OK.” The file will download.
- Please note: if you take attendance before the class session’s start date/time, the attendance will not be reported. Only class that were recorded after the start date/time will be reported.
Recovering the Attendance Activity, if Deleted
If you accidentally delete the automatically populated Attendance activity:
- If it’s been less than 7 days (and more than ~5 minutes), you can recover the activity from the ‘Recycle Bin.’ Click on the gearwheel in the upper right corner of the main page of the course, and select the ‘Recycle bin’ option near the bottom of the list. Locate the ‘Attendance activity and click ‘Restore.’
- If it’s been more than 7 days since the Attendance activity was deleted and there were no attendance data points that need to be recovered, then you can add a new Attendance activity.
- Click on the gearwheel in the upper right corner and select the ‘Turn editing on’ option.
- Then locate the ‘+Add an activity or resource’ link in the bottom right corner of the main/general section.
- From the pop-up select the ‘Attendance’ activity type and click the ‘Add’ button.
- On the ‘Attendance’ settings page, make sure you expand the ‘Grade’ section. By default, the system will choose to have this activity graded out of 100 points. If you do not want the activity to be automatically graded and show up in your gradebook, change the grade ‘Type’ from ‘Point’ to ‘None.’
- Click the ‘Save and display’ button.
- Now step through the process to add class sessions to this new ‘Attendance’ activity.
- If it’s been more than 7 days since the Attendance activity was deleted and there WERE Attendance data points which you need to recover, please contact Moodle Support directly.